Category: Exams of Microsoft AZ-304 (Page 1 of 2)

Security Defaults – Understanding User Authentication-2

To set up CA, you first need to disable Security Defaults. To perform this, follow these steps:

  1. Navigate to the Azure portal at https://portal.azure.com.
  2. In the top bar, search for and select Active Directory.
  3. On the left-hand menu, click Properties.
  4. At the bottom of the page, click Manage Security Defaults.
  5. A side window will appear, with an option to disable Security Defaults.

The next step is to purchase AD licenses, as follows:

  1. Navigate to the Azure portal at https://portal.azure.com.
  2. In the top bar, search for and select Active Directory.
  3. On the left-hand menu, click Licenses.
  4. On the main page, click Manage your purchased licenses.
  5. Click Try / Buy.
  6. A side window will appear; click Purchase services.
  7. This will open a new browser window: the Purchase Services page of the Microsoft 365 admin center (admin.microsoft.com).
  8. Scroll to the bottom of the page and select Security and Identity under Other categories.
  9. Select Azure Active Directory Premium P2.
  10. Click Buy.
  11. Choose whether to pay monthly or pay for a full year and select how many licenses you need. Click Check out now.
  12. Complete the checkout process.

Once you have completed the checkout process, you need to assign your licenses to your users, as follows:

  1. Navigate back to the Azure portal at https://portal.azure.com.
  2. In the top bar, search for and select Active Directory.
  3. On the left-hand menu, click Licenses.
  4. On the main page, click Manage your purchased licenses.
  5. Click All products.
  6. Click Azure Directory Premium P2 (your licenses count has increased by the number of licenses you have purchased).
  7. Click Assign.
  8. Click Users.
  9. In the side window that appears, select the user(s) you wish to assign licenses to. Click Select.
  10. Click Assignment options.
  11. In the side window that appears, set your license options and click OK.
  12. Click Assign.

With Security Defaults disabled and your premium licenses assigned, you can now configure CA policies, as follows:

  1. Navigate to the Azure portal at https://portal.azure.com.
  2. In the top bar, search for and select Azure AD Conditional Access.
  3. On the left-hand menu, click Named locations.
  4. Click + New location.
  5. On this page, you can define specific countries or IP ranges that users can sign in from. Click the back button in your browser to return to the CA page, or click the CA breadcrumb.
  6. On the left-hand menu, click Policies.
  7. Click New Policy.
  8. Enter Managers under name.
  9. Click Users and groups.
  10. Click the Users and groups checkbox, and then select a user. Click OK.
  11. Click Conditions. You can choose different risk profiles depending on your needs—for example, click Sign-In risk, and then click the Medium checkbox, as in the following example. Click Select:

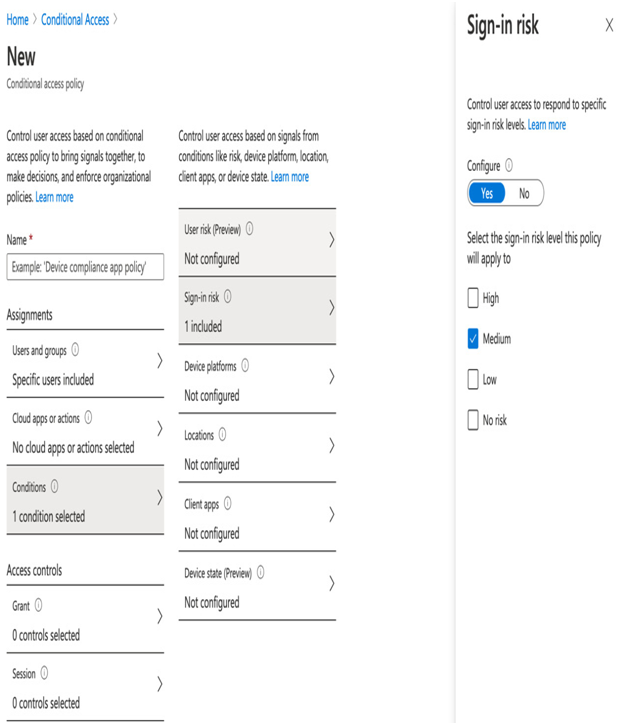
Figure 3.14 – Assigning risk policies

  1. Choose the action to perform when the policy is triggered. Click Grant under Access controls, and then click the Require multi-factor authentication checkbox. Click Select.
  2. Set the Enable policy to Report-only.
  3. Click Create.

In this example, we have created a simple access policy that only applies to a single user. The policy will trigger if the user’s activity is deemed medium risk, and will then enforce MFA. However, we set the policy to Report-only, meaning that the actual MFA enforcement won’t take place. This is advised when first creating policies in order to ensure that you do not inadvertently lock users out. In other words, it gives you the ability to test policies before applying them.

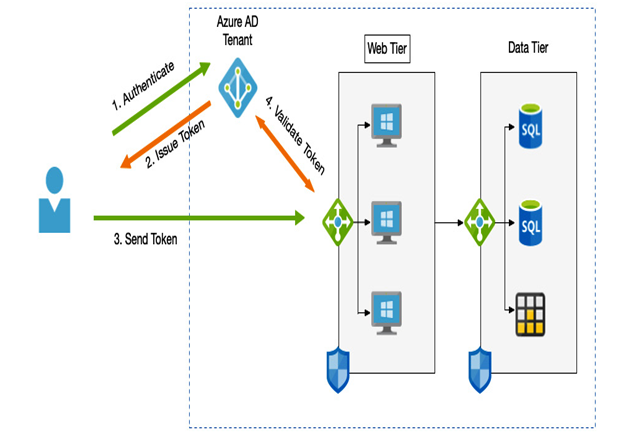
In this section, we examined how to provide greater control over the user authentication process for internal users. Sometimes, however, we will want to provide access to external users.

Security Defaults – Understanding User Authentication-1

Microsoft provides aset of tools called CA—however, these require configuration and ongoing management, plus you must upgrade to the Azure AD Premium P1 tier to use it.

For some organizations, this may either involve too much effort (perhaps you are a small team) or possibly cost too much.

Because security is so important, Microsoft offers Security Defaults—these are a set of built-in policies than protect your organization against common threats. Essentially, enabling this feature preconfigures your AD tenant with the following:

  • Requires all users to register and use MFA
  • Requires administrators to perform MFA
  • Blocks legacy authentication protocols
  • Protects privileged activities such as accessing the Azure portal

An important note to consider is that Security Defaults is completely free and does NOT require a premium AD license.

It’s also important to understand that because this is a free tier, it’s an all-or-nothing package. It’s also worth noting that the MFA mechanism only works using security codes through a mobile app authenticator (such as Microsoft Authenticator) or a hardware token. In other words, you cannot use the text message or calling features.

Security Defaults is enabled by default on new subscriptions, and therefore you don’t need to do anything. However, for organizations that require more control, you should consider CA.

Understanding and setting up CA

For organizations that want more control over security or that already have an Azure AD Premium P1 or P2 license, CA can provide a much more granular control over security, with better reporting capabilities.

Azure uses several security-based services that can be applied depending on various attributes, known as signals, which are then used to make decisions around which security policies need to be applied.

This process and set of tools are called CA, and this can be accessed in the Azure portal via the AD Security blade.

Tip

For the exam, Azure CA requires an Azure AD Premium P1 license.

Standard signals you can use when making decisions include the following:

  • User or group membership: For example, if users are in a group that will give them access to particularly sensitive systems or high levels of access—that is, an admin group.
  • IP location: For example, when users are signing in from a controlled IP range such as a corporate network, or if users are signing in from a particular geography that has specific local requirements.
  • Device-specific platforms, such as mobile devices, may need different security measures.
  • Application: Similar to groups, specific applications, regardless of role, may need additional protective measures—for example, a payroll application.
  • Real-time risk detection: Azure Identity Protection monitors user activity for “risky” behavior. If triggered, this can force particular policies to be activated, such as a forced password reset.
  • Microsoft Cloud App Security: Enables application sessions to be monitored, which again can trigger policies to be applied.
  • Terms of use: Before accessing your systems, you might need to get consent from users by requesting a terms-of-use policy to be signed. A specific Azure AD policy can be defined, requiring users to sign this before they can sign in.

Once a signal has been matched, various decisions can then be made regarding a user’s access. These include the following:

  • Block Access

–Block the user from proceeding entirely.

  • Grant Access, which is further broken down into the following:

–Require MFA

–Require device compliancy (via device policies)

–Require device to be Hybrid Azure AD-joined

–Requirement an approved client app

–Requirement of an app protection policy—that is, a review

Integrating AD – Understanding User Authentication

One of the first steps is to understand how your organization wishes to authenticate its users and from where. A cloud-native approach may be sufficient for some, but some form of integration with an on-premises directory will be required for others. We will look at what they are in the following sections.

Cloud native

The simplest scenario is cloud native; we only need to set up user accounts within Azure AD. Authentication is performed via the web using HTTPS, and access is only required into Azure or other services that integrate with Azure AD—such as a web application using token-based authentication, as we can see in the following diagram:

Figure 3.6 – Cloud-native authentication

Cloud native is mostly used by new organizations or those without an existing directory service. For companies that already have an AD database, it is common to integrate with it, and for this we can use Azure AD Connect.

Azure AD Connect

Azure AD Connect provides the most straightforward option when you need to provide integration with AD.

AD Connect is a synchronization tool that you install on an on-premises server and that essentially copies objects between your on-premises network and your Azure AD.

This scenario is excellent for providing access to Azure resources for existing users and has self-service capabilities such as a password reset, although this requires the Azure AD Premium add-on.

In a typical use case, you may have a web application deployed in Azure that you need to provide remote access to for your users. In other words, users may be connecting to the web app over the public internet, but still need to be challenged for authentication. The following diagram depicts such a scenario:

Figure 3.7 – Hybrid authentication

Azure AD Connect provides a way of keeping your user details (such as login name and password) in sync with the accounts in Azure AD.

Also, note there is no VNET integration—that is, the web apps themselves are not connected to a VNET that is accessed via a VPN or express route. When users try to access the web app, they will authenticate against Azure AD.

When setting up AD Connect, you have several options. You can set up AD Connect to only replicate a subset of users using filtering—so, you should carefully consider which accounts are actually needed and only sync those required.

The AD Connect agent is installed on a server in your environment. The only requirement is that it must have access to the AD by being installed on a domain-connected computer.

The download link for the AD Connect agent can be retrieved by going to the AD Connect menu option in the Azure AD blade in the Azure portal. To access it, perform the following steps:

  1. Navigate to the Azure portal at https://portal.azure.com.
  2. In the top bar, search for and select Active Directory.
  3. In the left-hand menu, click AD Connect.
  4. You will see the link to the AD Connect agent, as in the following example:Figure 3.8 – Getting the AD Connect agent download link

Figure 3.8 – Getting the AD Connect agent download link

  1. Copy the agent onto the server you wish to install it and run it, then follow through the installation wizard.

It is recommended that you install the agent on at least two or, preferably, three servers in your environment to protect the synchronization process should the primary server fail.

Important note

The AD Connect agent cannot be actively synchronizing on more than one server. When installing the agent on the standby servers, you must configure them to be in stand-by mode. In the event of the primary server failing, you need to manually reconfigure one of the secondary servers and take them out of stand-by mode.

An important aspect of Azure AD Connect is how users’ passwords are validated, which in turn defines where the password is stored.

Azure tenants – Understanding User Authentication

Each tenant has its own set of users; therefore, if you have more than one tenant, you would have distinctly separate user databases.

A tenant, therefore, defines your administrative boundaries, and Azure subscriptions can only belong to one single tenant, although a single tenant can contain multiplesubscriptions, as we can see in the following diagram:

Figure 3.5 – Azure AD tenants

A single tenant is generally sufficient for corporate systems whereby only internal people require access. However, there are scenarios whereby you may want to build applications that support users from different companies.

Software-as-a-Service (SaaS) products such as Microsoft Dynamics CRM are a classic example. This is built as a single saleable system; however, it is multi-tenant in that because it is made for external users and not just Microsoft employees, it must be able to support sign-on from other organizations.

Another scenario to consider is whether you want to separate your users into development and production tenants. For some, a single tenant that houses the same user accounts for development and production systems is acceptable. In such cases, production and development may instead be covered in separate subscriptions, or even just different resource groups within a subscription.

However, having a single tenant makes it harder to test new identity policies, for example, and therefore a separate tenant may be required. While it is possible to move Azure subscriptions between tenants, because each tenant has a unique user database, doing so essentially resets any roles and permissions you have set.

As you can see, it is essential to define your tenant strategy early on to prevent problems later.

Azure AD editions

Azure AD provides a range of management tools; however, each user must be licensed, and depending on the type of license, this will determine which tools are available.

Out of the box, Azure provides a free tier known as Azure AD Free.

The free tier provides user and group management, on-premises synchronization, basic reports, and self-service password change facilities for cloud users. In other words, it gives you the absolute basics you need to provide your cloud-based access.

For more advanced scenarios, you can purchase AD Premium P1 licenses. Over and above the free tier, P1 lets your hybrid users—those with synchronized accounts between on-premises and cloud—to access both on-premises and cloud resources seamlessly.

It also provides more advanced administration tooling and reporting, such as dynamic groups, self-service group management, Microsoft Identity Manager (MIM), and cloud writebacks for password changes; that is, if a user changes their password through the cloud-based self-service tool, this change will write back to the on-premises account as well.

AD Premium P2 gives everything in basic and P1 licenses but adds on Azure AD Identity Protection and Privileged Identity Management (PIM). We will cover each of these in detail later, but for now, it’s essential for the exam to understand you’ll need a P2 license to use these advanced features.

Finally, you can also get additional Pay As You Go licenses for Azure AD Business-to-Consumer (B2C) services. These can help you provide identity and access management solutions for customer-facing apps.

In this section, we have looked at how AD and Azure AD differ, how we can provide services for external users, and what the different editions provide. Next, we will consider how we integrate an existing on-premises directory with the cloud.

Azure AD versus AD DS – Understanding User Authentication

Azure AD is the next evolution. It takes identity to the next level by building upon AD DS and provides an Identity as a Service (IDaaS) to provide this same level of security and access management to the cloud.

Just as with AD DS, Azure AD is a database of users that can be used to grant access to all your systems. It’s important to understand that it is an entirely separate database— one that is stored within Azure—and therefore the underlying hardware and software that powers it is wholly managed by Azure—hence IDaaS.

In a traditional on-premises world, you would be responsible for building directory servers to host and manage AD DS. As an IT administrator or architect, you need to consider how many servers you require and what specifications they need to be to support your user load and resilience, to ensure the system is always available. If your identity system failed due to hardware failure, access to all your systems would be blocked.

Azure AD is a managed service, and Microsoft ensures the integrity, security, and resilience of the platform for you.

Whereas AD DS secures domain-joined devices, Azure AD secures cloud-based systems such as web apps. With Azure Web Apps, for example, they are not domain-joined to an internal network. Users may authenticate over the internet—that is, over public networks, as opposed to internal networks. As such, the protocols used must also be different—NTLM and Kerberos used in AD DS would not be suitable and, instead, traditional web protocols must be used—that is, HyperText Transfer Protocol Secure (HTTPS), as depicted in the following diagram:

Figure 3.4 – Azure AD versus AD DS protocols

Azure AD also integrates with other Microsoft online services such as Office 365. If you sign up for Microsoft Office 365, an Azure AD tenant will be created for you to manage your users. This same “tenant” can also be used to manage your Azure subscriptions and the apps you build within them.

Azure AD is distinctly separate from AD DS—that is, they are entirely different databases. However, you can link or synchronize Azure AD and your on-premises AD DS, effectively extending your internal directory into the cloud. We will cover this in more detail later, but for now, understand that although different, AD DS and cloud-based Azure AD can be connected.

Important note

Azure AD, even with synchronization, does not support domain-joining virtual machines (VMs). For domain-joined VMs in Azure, either allow AD DS traffic back to on-premises, build domain controllers within the Azure network or use Azure AD DS, which is a fully managed AD DS solution.

The following table shows some of the common differences between the two services:

An instance of Azure AD is called an Azure tenant. Think of a tenant as the user database. In the next section, we will look at tenants in more detail.

Why AD? – Understanding User Authentication

Let’s take a step back and consider a straightforward scenario: that of an online e-commerce website. Before you can order something, you need to register with that website and provide some basic details—a sign-in name, an email, a password, and so on.

A typical website such as the one shown in the following diagram may simply store your details in a database and, at its simplest, this may just be a user record in a table:

Figure 3.1 – Simple username and password authentication

For more advanced scenarios that may require different users to have different levels of access—for example, in the preceding e-commerce website—the user databases may need to accommodate administrative users as well as customers. Administrative users will want to log in and process orders and, of course, we need to ensure the end customers don’t get this level of access.

So, now, we must also record who has access to what, and ensure users are granted access accordingly, as in the example shown in the following diagram:

Figure 3.2 – Role-based authorization

The same would also be valid for a corporate user database. For example, the company you work for must provide access to various internal systems—payroll, marketing, sales, file shares, email, and so on. Each application will have its own set of security requirements, and users may need access across multiple systems.

For corporate users, Microsoft introduced Active Directory Domain Services (AD DS), which is a dedicated identity management system that allows businesses to manage user databases in a secure and well-organized way. Users in an AD are granted access to other systems (provided they support it) from a single user database. Microsoft AD DS takes care of the complexity and security of user management. See the example shown in the following diagram:

Figure 3.3 – AD

From a single account, IT administrators can provide access to file shares, email systems, and even web applications—provided those systems are integrated with AD. Typically, this would be achieved by domain-joining the device that hosts the application—be it an email server, web server, or file server; that is, the hosting device becomes part of the network, and AD manages not only the user accounts but the computer accounts as well.

In this way, the identity mechanism is a closed system—that is, only internal computers and users have access. Although external access mechanisms have been developed over time to provide remote access, these are still about securely connecting users by essentially extending that “internal” network.

Microsoft AD DS uses specific networking protocols to manage the security of devices and users—that is, the way devices communicate with each other—known as Integrated Windows Authentication (IWA); they are New Technology LAN Manager (NTLM) and Kerberos.

Microsoft AD DS is a common standard today for many organizations. Still, as discussed, it is built around the concept of a closed system—that is, the components are all tightly integrated by enforcing the requirement for them to be “joined.”

Architecting for monitoring and operations – Principles of Modern Architecture

For the topics we have covered in this chapter to be effective, we must continually monitor all aspects of our system. From security to resilience and performance, we must know what is happening at all times.

Monitoring for security

Maintaining the security of a solution requires a monitoring solution that can detect, respond, and ultimately recover from incidents. When an attack happens, the speed at which we respond will determine how much damage is incurred.

However, a monitoring solution needs to be intelligent enough to prioritize and filter false positives.

Azure provides several different monitoring mechanisms in general and, specifically, in terms of security, and can be configured according to your organization’s capabilities. Therefore, when designing a monitoring solution, you must align with your company’s existing teams to effectively direct and alert appropriately, and send pertinent information as required.

Monitoring requirements cover more than just alerts; the policies that define business requirements around configuration settings such as encryption, passwords, and allowed resources must be checked to confirm they are being adhered to. The Azure risk and compliance reports will highlight any items that deviate so that the necessary team can investigate and remediate.

Other tools, such as Azure Security Center, will continually monitor your risk profile and suggest advice on improving your security posture.

Finally, security patching reports also need regular reviews to ensure VMs are being patched so that insecure hosts can be investigated and brought in line.

Monitoring for resilience

Monitoring your solution is not just about being alerted to any issues; the ideal scenario is to detect and remediate problems before they occur—in other words, we can use it as an early warning system.

Applications should include in their designs the ability to output relevant logs and errors; this then enables health alerts to be set up that, when combined with resource thresholds, provide details of the running processes.

Next, a set of baselines can be created that identify what a healthy system looks like. When anomalies occur, such as long-running processes or specific error logs, they are spotted earlier.

As well as defined alerts that will proactively contact administrators when possible issues are detected, visualization dashboards and reporting can also help responsible teams see potential problems or irregular readings as part of their daily checks.

Monitoring for performance

The same CPU, RAM, and input/output (I/O) thresholds used for early warning signs of errors also help identify performance issues. By monitoring response times and resource usage over time, you can understand usage patterns and predict when more power is required.

Performance statistics can either manually set scaling events through the use of schedules or set automated scaling rules more accurately.

Keeping track of scaling events throughout the life cycle of an application is useful. If an application is continually scaling up and down or not scaling at all, it could indicate that thresholds are set incorrectly.

Again, creating and updating baseline metrics will help alert you to potential issues. If resources for a particular service are steadily increasing over time, this information can predict future bottlenecks.

Architecting for performance – Principles of Modern Architecture

As we have already seen, resilience can be closely linked to performance. If a system is overloaded, it will either impact the user experience or, in the worst case, fail altogether.

Ensuring a performant solution is more than just increasing resources; how our system is built can directly impact the options available and how efficient they are.

Breaking applications down into smaller discrete components not only makes our solution more manageable but also allows us to increase resources just where they are needed. If we wish to scale in a monolithic, single-server environment, our only option is to add more random-access memory (RAM) and CPU to the entire system. As we decompose ourapplications and head toward a microservices pattern whereby individual services are hosted independently, we can apportion additional resources where needed, thus increasing performance efficiently.

When we need to scale components, we have two options: the first is to scale up—add more CPU and RAM; the second option is to scale out—deploy additional instances of our services behind a load balancer, as per the example in the following diagram:

Figure 2.3 – Scale-out: identical web servers behind a load balancer

Again, our choice of the underlying technology is important here—virtual servers can be scaled up or out relatively quickly, and with scale, sets can be dynamic. However, virtual servers are slower to scale since a new machine must be imaged, loaded, and added to the load balancer. With containers and PaaS options such as Azure Web Apps, this is much more lightweight and far easier to set up; containers are exceptionally efficient from a resource usage perspective.

We can also decide what triggers a scaling event; services can be set to scale in response to demand—as more requests come in, we can increase resources as required and remove them again when idle. Alternatively, we may wish to scale to a schedule—this helps control costs but requires us to already know the periods when we need more power.

An important design aspect to understand is that it is generally more efficient to scale out than up; however, to take advantage of such technologies, our applications need to avoid client affinity.

Client affinity is a scenario whereby the service processing a request is tied to the client; that is, it needs to remember state information for that client from one request to another. In a system built from multiple backend hosts, the actual host performing the work may change between requests.

Particular types of functions can often cause bottlenecks—for example, processing large volumes of data for a report, or actions that must contact external systems such as sending emails. Instead of building these tasks as synchronous activities, consider using queuing mechanisms instead. As in the example in the following diagram, requests by the User are placed in a Job Queue and control is released back to the User. A separate service processes the job that was placed in the Job Queue and updates the User once complete:

Figure 2.4 – Messaging/queueing architectures

Decoupling services in this fashion gives the perception of a more responsive system and reduces the number of resources to service the request. Scaling patterns can now be based on the number of items in a queue rather than an immediate load, which is more efficient.

By thinking about systems as individual components and how those components respond—either directly or indirectly—your solution can be built to not just scale, but to scale in the most efficient manner, thereby saving costs without sacrificing the user experience.

In this section, we have examined how the right architecture can impact our solution’s ability to scale and perform in response to demand. Next, we will look at how we ensure these design considerations are carried through into the deployment phase.

Architecting for resilience and business continuity – Principles of Modern Architecture

Keeping your applications running can be important for different reasons. Depending on your solution’s nature, downtime can range from a loss of productivity to direct financial loss. Building systems that can withstand some form of failure has always been a critical aspect of architecture, and with the cloud, there are more options available to us.

Building resilient solutions comes at a cost; therefore, you need to balance the cost of an outage against the cost of preventing it.

High Availability (HA) is the traditional option and essentially involves doubling up on components so that if one fails, the other automatically takes over. An example might be a database server—building two or more nodes in a cluster with data replication between them protects against one of those servers failing as traffic would be redirected to the secondary replica in the event of a failure, as per the example in the following diagram:

Figure 2.2 – Highly available database servers

However, multiple servers are always powered on, which in turn means increased cost. Quite often, the additional hardware is not used except in the event of a failure.

For some applications, this additional cost is less than the cost of a potential failure, but it may be more cost-effective for less critical systems to have them unavailable for a short time. In such cases, our design must attempt to reduce how long it takes to recover.

The purpose of HA is to reduce the Mean Time Between Failures (MTBF). In contrast, the alternative is to reduce the Mean Time To Recovery (MTTR)—in other words, rather than concentrating on preventing outages, spend resources on reducing the impact and speeding up recovery from an outage. Ultimately, it is the business who must decide which of these is the most important, and therefore the first step is to define their requirements.

Defining requirements

When working with a business to understand their needs for a particular solution, you need to consider many aspects of how this might impact your design.

Identifying individual workloads is the first step—what are the individual tasks that are performed, and where do they happen? How does data flow around your system?

For each of these components, look for what failure would mean to them—would it cause the system as a whole to fail or merely disrupt a non-essential task? The act of calculating costs during a transactional process is critical, whereas sending a confirmation email could withstand a delay or even complete failure in some cases.

Understand the usage patterns. For example, a global e-commerce site will be used 24/7, whereas a tax calculation service would be used most at particular times of the year or at the month-end.

The business will need to advise on two important metrics—the Recovery Time Objective (RTO) and the Recovery Point Objective (RPO). The RTO dictates an acceptable amount of time a system can be offline, whereas the RPO determines the acceptable amount of data loss. For example, a daily backup might mean you lose up to a day’s worth of data; if this is not acceptable, more frequent backups are required.

Non-functional requirements such as these will help define our solution’s design, which we can use to build our architecture with industry best practices.

Patching – Principles of Modern Architecture

When working with virtual machines (VMs), you are responsible for managing the operating system that runs on them, and attackers can seek to exploit known vulnerabilities in that code.

Regular and timely patching and security updates with anti-virus and anti-malware agents are the best line of defense against this. Therefore, your solution design needs to include processes and tools for checking, testing, and applying updates.

Of course, it is not just third-party code operating systems that are susceptible; your application code is vulnerable too.

Application code

Most cloud services run custom code, in the form of web apps or backend application programming interface (API) services. Hackers often look for programming errors that can open holes in the application. As with other forms of protection, multiple options can be included in your architecture, and some are listed here:

  • Coding techniques: Breaking code into smaller, individually deployed components and employing good development practices such as Test-Driven Design (TDD), paired programming, or code reviews can help ensure code is cleaner and error-free.
  • Code scanners: Code can be scanned before deployment to check for known security problems, either accidental or malicious, as part of a deployment pipeline.
  • Web application firewalls (WAFs): Unlike layer 3 or 4 firewalls that block access based on Internet Protocol (IP) or protocol, WAFs inspect network packet contents, looking for arbitrary code or common exploits such as SQL injection attacks.

Application-level security controls help protect you against code-level exploits; however, new vulnerabilities are uncovered daily, so you still need to prepare for the eventuality of a hacker gaining data access.

Data encryption

If the data you hold is sensitive or valuable, you should plan for the eventuality that your security controls are bypassed by making that data impossible to read. Encryption will achieve this; however, there are multiple levels you can apply. Each level makes your information more secure, but at the cost of performance.

Encryption strategies should be planned carefully—standard encryption at rest is lightweight but provides a basic protection level and should be used for all data as standard.

For more sensitive data such as credit card numbers, personal details, passwords, and so on, additional levels can be applied. Examples of how and where we can apply controls are given here:

  • Databases: Many databases now support Transparent Data Encryption (TDE), whereby the data is encrypted. Applied by the database engine itself, consuming applications are unaware and therefore do not need to be modified.
  • Database fields: Some databases provide field-level encryption that can be applied by the database engine itself or via client software. Again, this can be transparent from a code point of view but may involve additional client software.
  • Applications: Applications themselves can be built to encrypt and decrypt data before it is even sent to the database. Thus, the database is unaware of the encryption, but the client must be built specifically to perform this.
  • Transport: Data can be encrypted when transferring between application components. HyperText Transfer Protocol Secure (HTTPS) using Secure Sockets Layer (SSL) certificates is the most commonly known for end-user websites, but communications between elements such as APIs should also be protected. Other transport layer encryption is also available—for example, SQL database connections or file shares.

Data can be encrypted using either string keys or, preferably, certificates. When using certificates, many cloud vendors, including Azure, offer either managed or customer-supplied keys. With managed keys, the cloud vendors generate, store, and rotate the certificates for you, whereas with customer-supplied keys, you are responsible for obtaining and managing them.

Keys, secrets, and certificates should always be stored in a suitably secure container such as a key vault, with access explicitly granted to the users or services that need them, and access being logged.

As with other security concerns, the variability and ranges of choices mean that you must carefully plan your encryption techniques.

On their own, each control can provide some protection; however, to give your solution the best defense, you need to implement multiple tactics.

« Older posts