One of the first steps is to understand how your organization wishes to authenticate its users and from where. A cloud-native approach may be sufficient for some, but some form of integration with an on-premises directory will be required for others. We will look at what they are in the following sections.
Cloud native
The simplest scenario is cloud native; we only need to set up user accounts within Azure AD. Authentication is performed via the web using HTTPS, and access is only required into Azure or other services that integrate with Azure AD—such as a web application using token-based authentication, as we can see in the following diagram:
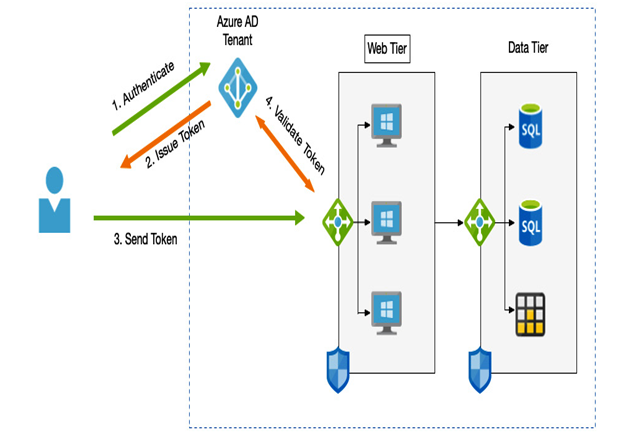
Figure 3.6 – Cloud-native authentication
Cloud native is mostly used by new organizations or those without an existing directory service. For companies that already have an AD database, it is common to integrate with it, and for this we can use Azure AD Connect.
Azure AD Connect
Azure AD Connect provides the most straightforward option when you need to provide integration with AD.
AD Connect is a synchronization tool that you install on an on-premises server and that essentially copies objects between your on-premises network and your Azure AD.
This scenario is excellent for providing access to Azure resources for existing users and has self-service capabilities such as a password reset, although this requires the Azure AD Premium add-on.
In a typical use case, you may have a web application deployed in Azure that you need to provide remote access to for your users. In other words, users may be connecting to the web app over the public internet, but still need to be challenged for authentication. The following diagram depicts such a scenario:
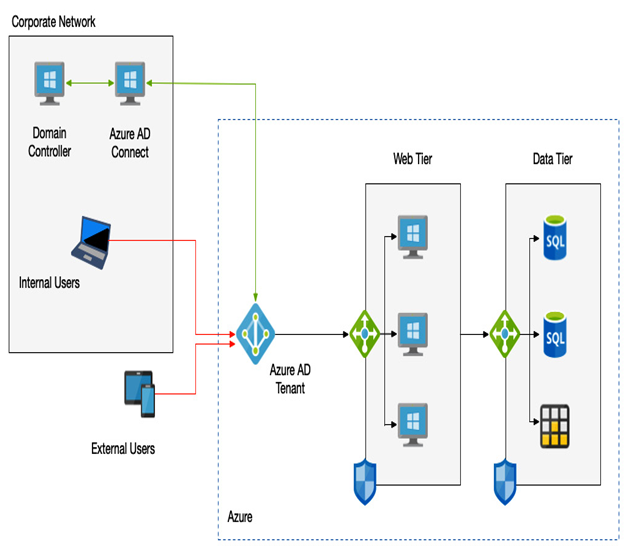
Figure 3.7 – Hybrid authentication
Azure AD Connect provides a way of keeping your user details (such as login name and password) in sync with the accounts in Azure AD.
Also, note there is no VNET integration—that is, the web apps themselves are not connected to a VNET that is accessed via a VPN or express route. When users try to access the web app, they will authenticate against Azure AD.
When setting up AD Connect, you have several options. You can set up AD Connect to only replicate a subset of users using filtering—so, you should carefully consider which accounts are actually needed and only sync those required.
The AD Connect agent is installed on a server in your environment. The only requirement is that it must have access to the AD by being installed on a domain-connected computer.
The download link for the AD Connect agent can be retrieved by going to the AD Connect menu option in the Azure AD blade in the Azure portal. To access it, perform the following steps:
- Navigate to the Azure portal at https://portal.azure.com.
- In the top bar, search for and select Active Directory.
- In the left-hand menu, click AD Connect.
- You will see the link to the AD Connect agent, as in the following example:
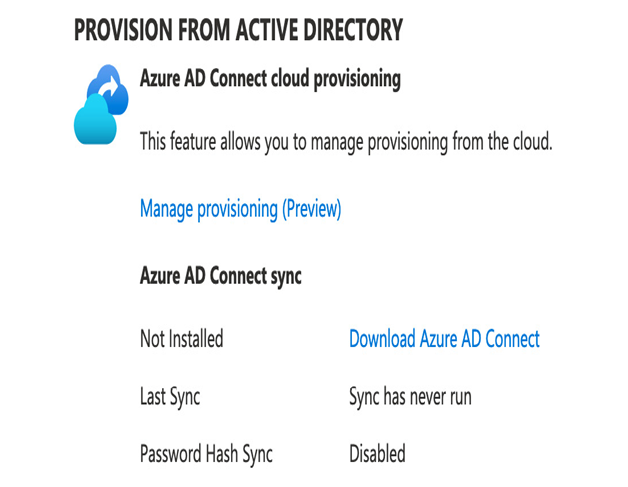
Figure 3.8 – Getting the AD Connect agent download link
- Copy the agent onto the server you wish to install it and run it, then follow through the installation wizard.
It is recommended that you install the agent on at least two or, preferably, three servers in your environment to protect the synchronization process should the primary server fail.
Important note
The AD Connect agent cannot be actively synchronizing on more than one server. When installing the agent on the standby servers, you must configure them to be in stand-by mode. In the event of the primary server failing, you need to manually reconfigure one of the secondary servers and take them out of stand-by mode.
An important aspect of Azure AD Connect is how users’ passwords are validated, which in turn defines where the password is stored.